Create events automatically by forwarding emails to your personal Busy Days address.
Note: The email address is available only when you have the Events module enabled. Enable it in Settings → Modules.
Your personal email address
Enable the Events module:
1. Open Settings
2. Select Modules
3. Enable Events
4. Save changes
Once the module is enabled, you automatically get a personal email address, for example:
fun-animal@in.busydays.fi
Finding your address
You can find your personal email address in the app:
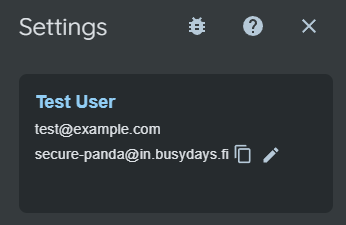
- Open Settings
- Copy the address using the copy button next to it
- Click the pencil icon (✏️) to open email settings
❗Note: If you don’t see the email settings or the pencil icon, make sure the Events module is enabled in Settings → Modules.
Changing your address
If you want to change your personal email address:
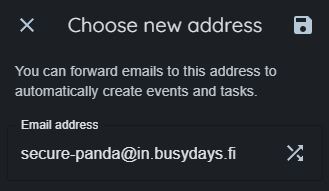
- Click the refresh button (🔄) next to the address
- The system generates a new unique animal name for you
- The new address will be active as soon as you save the changes
❗Note: When you change the address, your old address will stop working. Remember to update the new address in your contacts and any automatic forwarding rules.
How the email address works
Automatic event creation
When you forward emails to your personal address:
- Busy Days receives your message
- The message content is analyzed automatically
- Event and task details are extracted from the content, such as:
- Dates and times
- Locations
- Other relevant details
- New events are created in the app for you to review
- Email attachments are saved as attachments on the event
Supported email types
The system works especially well with:
✅ Meeting invitations
- Calendar invites (.ics and .ical attachments)
- Meeting requests
- Appointment proposals
✅ Booking confirmations
- Doctor’s appointments
- Hairdresser and beauty appointments
- Restaurant and hotel bookings
- Flight and train tickets
✅ School and daycare messages
- Parent evenings
- School events
- Field trip days
✅ Reminders and notifications
- Invoice due dates
- Delivery dates for orders
Forwarding email
Option 1: Forward an email
The easiest way to use your Busy Days email address is to forward emails to it:
- Open the email message
- Select Forward
- Enter your Busy Days address as the recipient (e.g.
modern-fawn@in.busydays.fi) - Send
You can also set up automatic forwarding rules in your email app so that recurring messages are automatically routed into Busy Days.
Option 2: Copy the address (Cc/Bcc)
You can also add your Busy Days address as a copy or blind copy recipient:
- Write or reply to an email
- Add your Busy Days address to Cc or Bcc
- Send as usual
This is useful, for example:
- When you schedule appointments via email
- When you email yourself reminders
- When you want to save an email thread as an event
Approve pending events
Reviewing events
When Busy Days receives and processes an email:
- Open Events → Pending events
- You’ll see a list of all events waiting for review
Approving an event
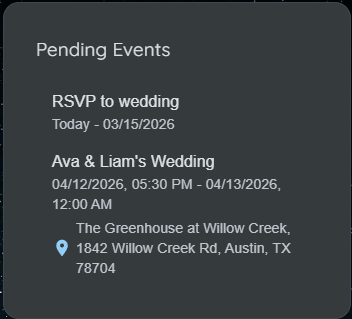
Each pending event shows:
- Suggested title
- Date and time
- Location (if detected)
- Description
- Original email (you can open it to verify)
- Attachments (all email attachments are preserved)
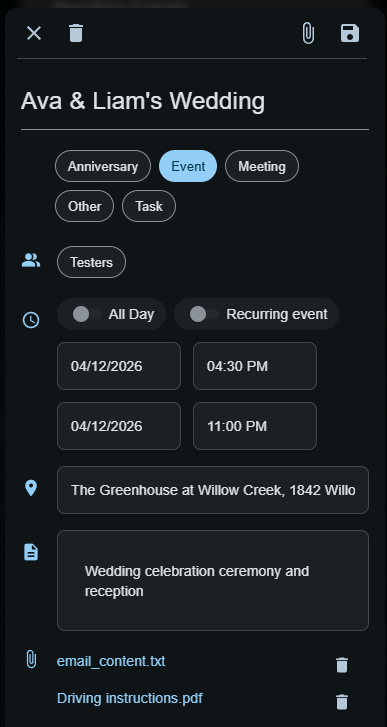
Approve the event:
- Review the details
- Edit if needed:
- Fix the title
- Change the time
- Add a reminder
- Select the event type
- Share with your group
- Click Approve
The event will be added to your calendar and removed from the pending list.
Rejecting an event
If the event is not relevant or the details are incorrect:
- Open the pending event
- Click Reject
- The event is deleted
Attachment handling
Supported attachments
Busy Days preserves and automatically processes the following attachment types.
Size limits:
- Email files (.eml/.msg): max 25 MB per file
- Attachments: max 25 MB per attachment
📄 Text files
- .txt
📅 Calendar files
- .ics, .ical
📝 Office files
- Word: .doc, .docx
- Excel: .xls, .xlsx
- PowerPoint: .ppt, .pptx
📄 PDF files
- .pdf
🖼️ Image files
- .jpg, .png, .gif, .bmp, .webp
Security:
- All files and attachments are scanned for safety
- File types are validated
Using attachments
All email attachments:
- Are saved automatically on the event
- Are visible in the event details
- Can be downloaded when needed
- Can be deleted individually when needed
Open attachments:
- Open the event
- Scroll down to Attachments
- Click an attachment to open or download it
Security
Allowed sender email addresses
For security reasons, Busy Days accepts emails only from email addresses you have added to your allowed list.
Adding an email address
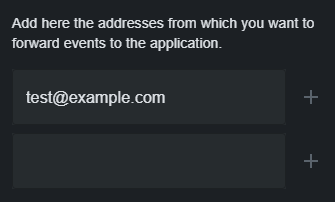
- Open Settings
- Click the pencil icon (✏️) to open email settings
- You’ll see the list of email addresses
- Enter a new email address in the empty field, for example:
calendar@company.commy.address@gmail.comearlychildhood@city.fi
- Click the plus (+) to add the address to the list
- Save changes
❗Note: You need to add each sender address separately. Busy Days checks the sender address before processing an email.
Removing an email address
- Open Settings
- Click the pencil icon (✏️) to open email settings
- You’ll see the list of email addresses
- Find the address you want to remove
- Click the minus (−) next to the address
- Save changes
Remember to add all addresses
If an email arrives from an address that is not on your list:
- The email is rejected automatically
- You won’t get a notification
- No event will be created
Data security
Busy Days’ email system is protected with:
✅ Signature verification
- Incoming emails are verified as authentic
✅ Sender validation
- Only allowed senders can create events
✅ Attachment scanning
- File type validation
- Size limits
- Malware prevention
✅ Privacy
- Each user can see only their own events
- Files are stored in user-specific folders
Practical tips
Best practices
1. Save your personal email address to your contacts
- You can find it in: Settings → Email settings
- Save your Busy Days address (e.g. modern-fawn@in.busydays.fi) to your phone contacts
- This makes forwarding messages quick and easy
2. Create automatic rules
- Set up automatic forwarding in your email client for certain senders
- For example, forward all @daycare.fi emails automatically
3. Review pending events regularly
- Go through pending events weekly
- Approve or reject quickly
- This keeps your calendar up to date
4. Use descriptive titles
- If the suggested title isn’t accurate, edit it to be clearer
- A good title helps you find the event later
5. Keep important attachments
- Tickets, booking confirmations, and other important documents are saved with the event
6. Change your address thoughtfully
- You can generate a new personal address if you want
- Remember: the old address will stop working
- Update the new address everywhere you use it (rules, contacts, etc.)
Frequently asked questions
Is my email address public?
No. Your address is personal and not shared publicly. Only you decide which sender addresses can send emails to it by adding them in your email settings.
Can I change the address?
Yes. You can change your email address at any time by clicking the refresh button next to it. The system will generate a new fun animal name. Note that your old address will stop working, so remember to update the new address everywhere you use it.
What happens if I don’t approve a pending event?
Pending events stay on the list until you either approve or reject them. They won’t appear in your calendar until they are approved.
Can one email create multiple events?
Yes. If an email contains multiple events (for example, a weekly program), separate pending events are created.
Does this work in all languages?
The system supports Finnish and English.
Does sending emails cost anything?
If you have the Events module enabled, you can send emails into the app for free.
What if I send the wrong message?
No worries. You can simply reject the pending event, and its data will be removed from the app.
Can I delete attachments individually?
Yes. You can delete individual attachments from the event details without deleting the whole event.
What happens if I disable the Events module?
If you disable the Events module, your email address will stop receiving messages and no events will be created from emails sent to it. When you enable the module again, the address will work normally again.
Do I need a paid subscription?
Email-to-event creation requires that you have the Events module enabled. Check subscription options in Settings → Change subscription.
How large files can I send?
Emails and their attachments can be:
- Email files (if you upload a .eml/.msg manually): max 25 MB
- Attachments: max 25 MB per attachment
If your email or attachments exceed these limits, the system will reject them for security reasons.
What happens to files that are too large?
If you send a file that is too large, the event can’t be created successfully. Reduce the file size or remove large attachments before sending.
Use Busy Days email and save time creating events.